| Engineer | School | Grade |
|---|---|---|
| Ryan Chakravarthy | Amador Valley High School | Junior |
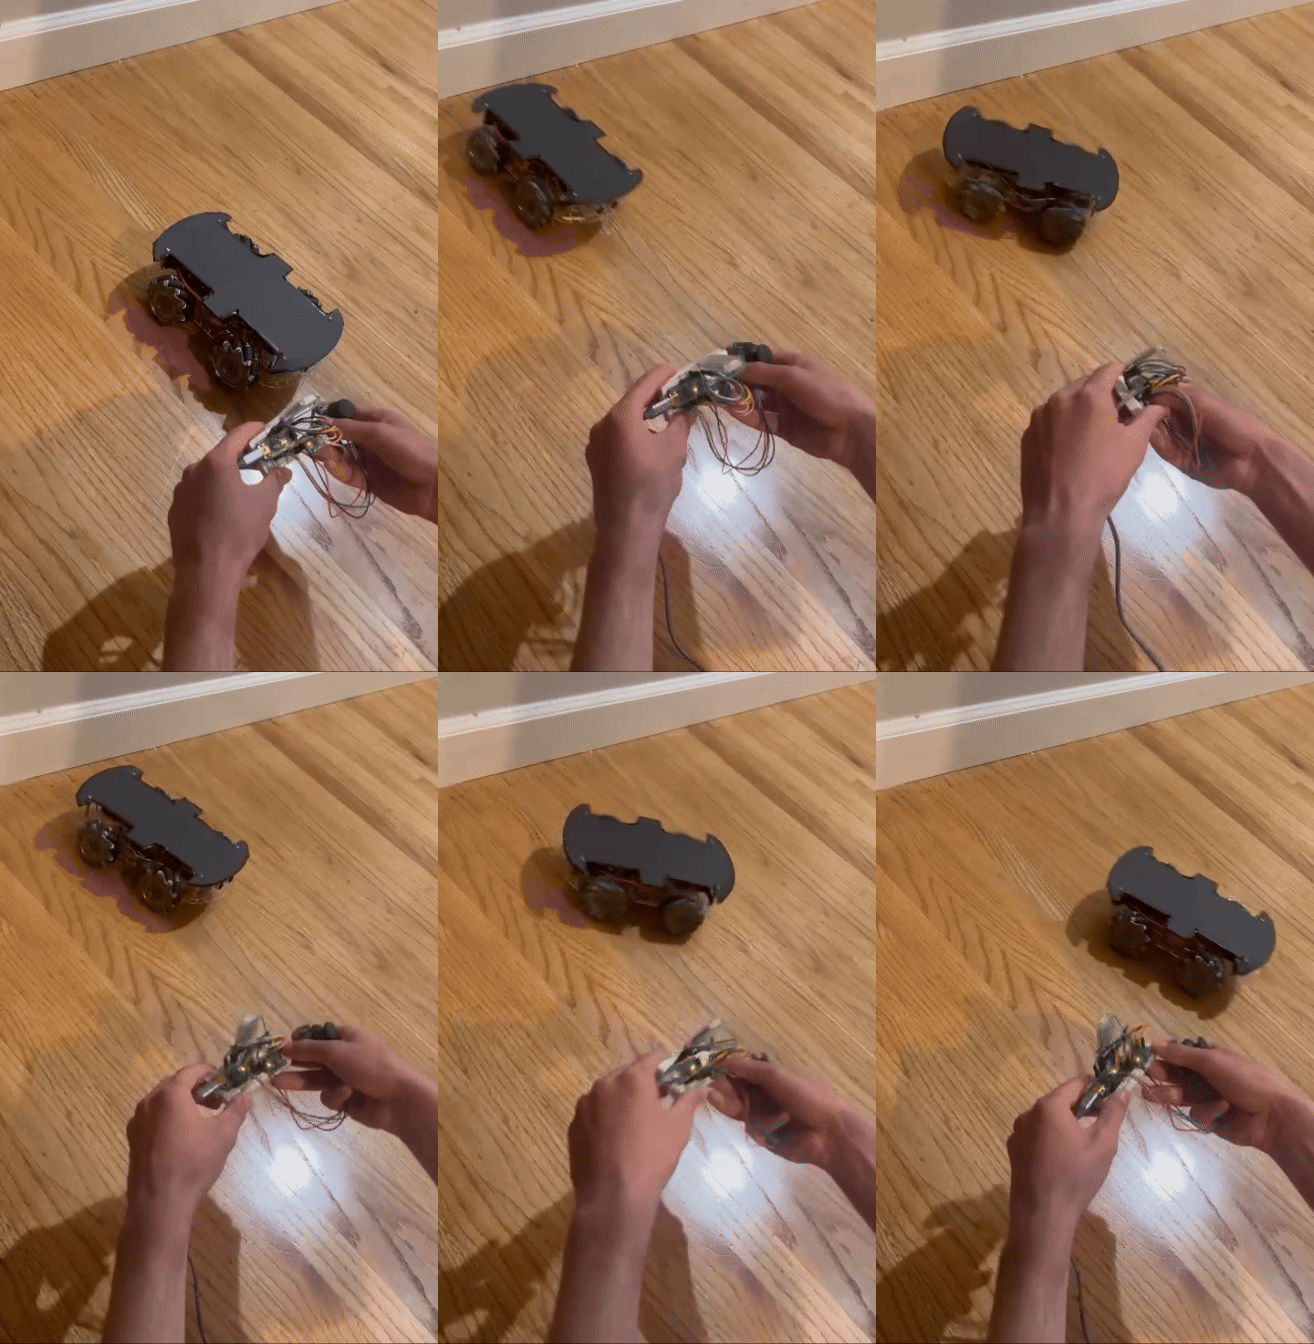
Demonstration

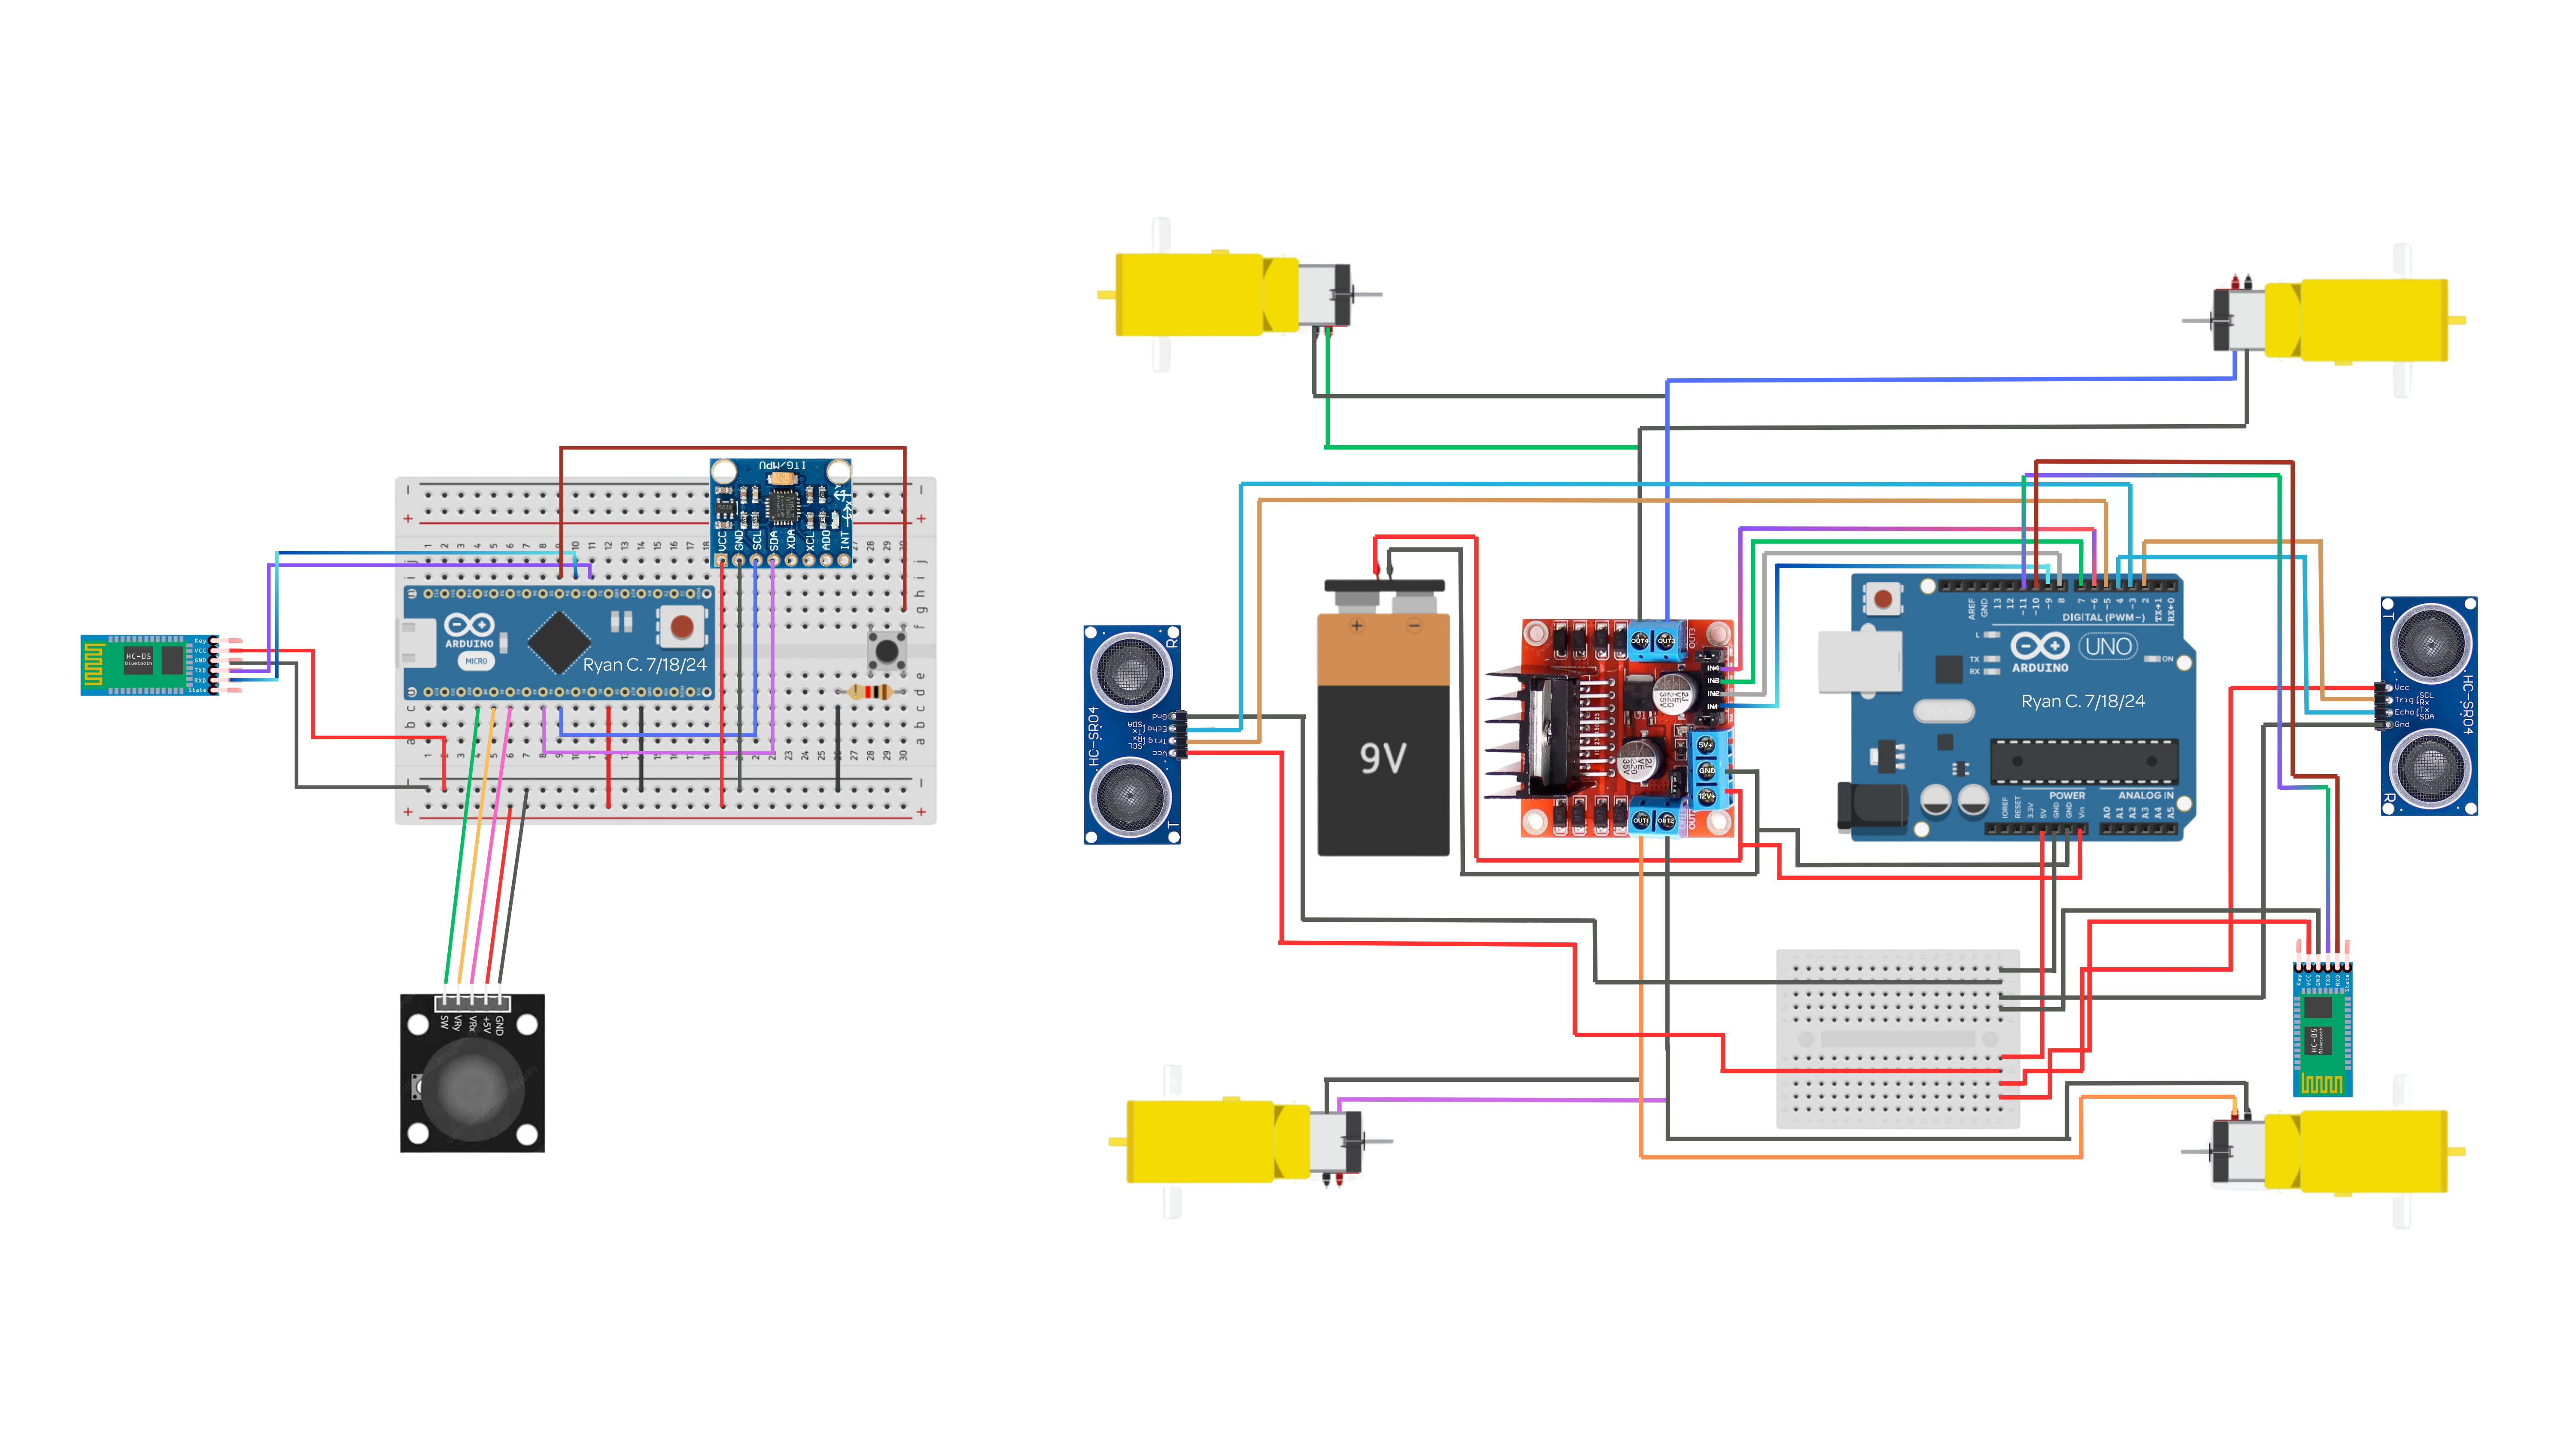
Schematic

Components
| Arduino Uno | $29.00 | controls H-Bride, motors, and HC-05 bluetooth module |
| Arduino Nano | $25.10 | controls IMU and HC-05 Bluetooth Module |
| MPU6050 Axis Accelerometer | $6.49 | detects orientation on hand |
| H-Bridge Motor Driver | $6.99 | direct module for motors |
| HC-05 Bluetooth Module (2x) | $9.99 | signals between Arduino Uno and Nano |
| Joyick for Arduino | $9.88 | alternate controller |
| Solderless Breadboard - Half Size | $5.98 | base of controller |
| Motors + Wheels + Base | $19.99 | motors, wheels, and car base |
| Set of Male/Female Wires | $7.39 | for wiring all components |
| Ultrasonic Sensor(s) | $6.99 | object detection |
| Set of 9V Batteries | $10.99 | power delivery via H-Bride 12V+ and GND |
| *On/Off Rocker Switch | $6.99 | optional power button |
| Micro USB Cable | $4.99 | connect Arduino Nano to computer |
| USB Type B | $3.89 | connect Arduino Uno to computer |
Final Milestone
For my modification, I added a joystick control method and a button to switch between the gesture and joystick inputs. In Arduino Uno I created joyStick() to read values from the VRx and VRy pins on the joystick and used ‘if’ and ‘else if’ statements to map the pin outputs to directions; then I correspondingly wrote these directions to the bluetooth. But with 2 input methods, I wanted to ensure that one could only be used one at a time. To do this, I added a button to the breadboard of my controller, that returned 1 while being pressed and 0 otherwise. I wanted the button to save the fact that it had been clicked and not that it was being clicked, so I made an algorithm in determineInput() using integers to register the difference in output from the button when being clicked, and incriment a counter while doing so. Then, I used ‘counter%2’ to switch between the input methods based on the even or odd value of the counter.
Third Milestone
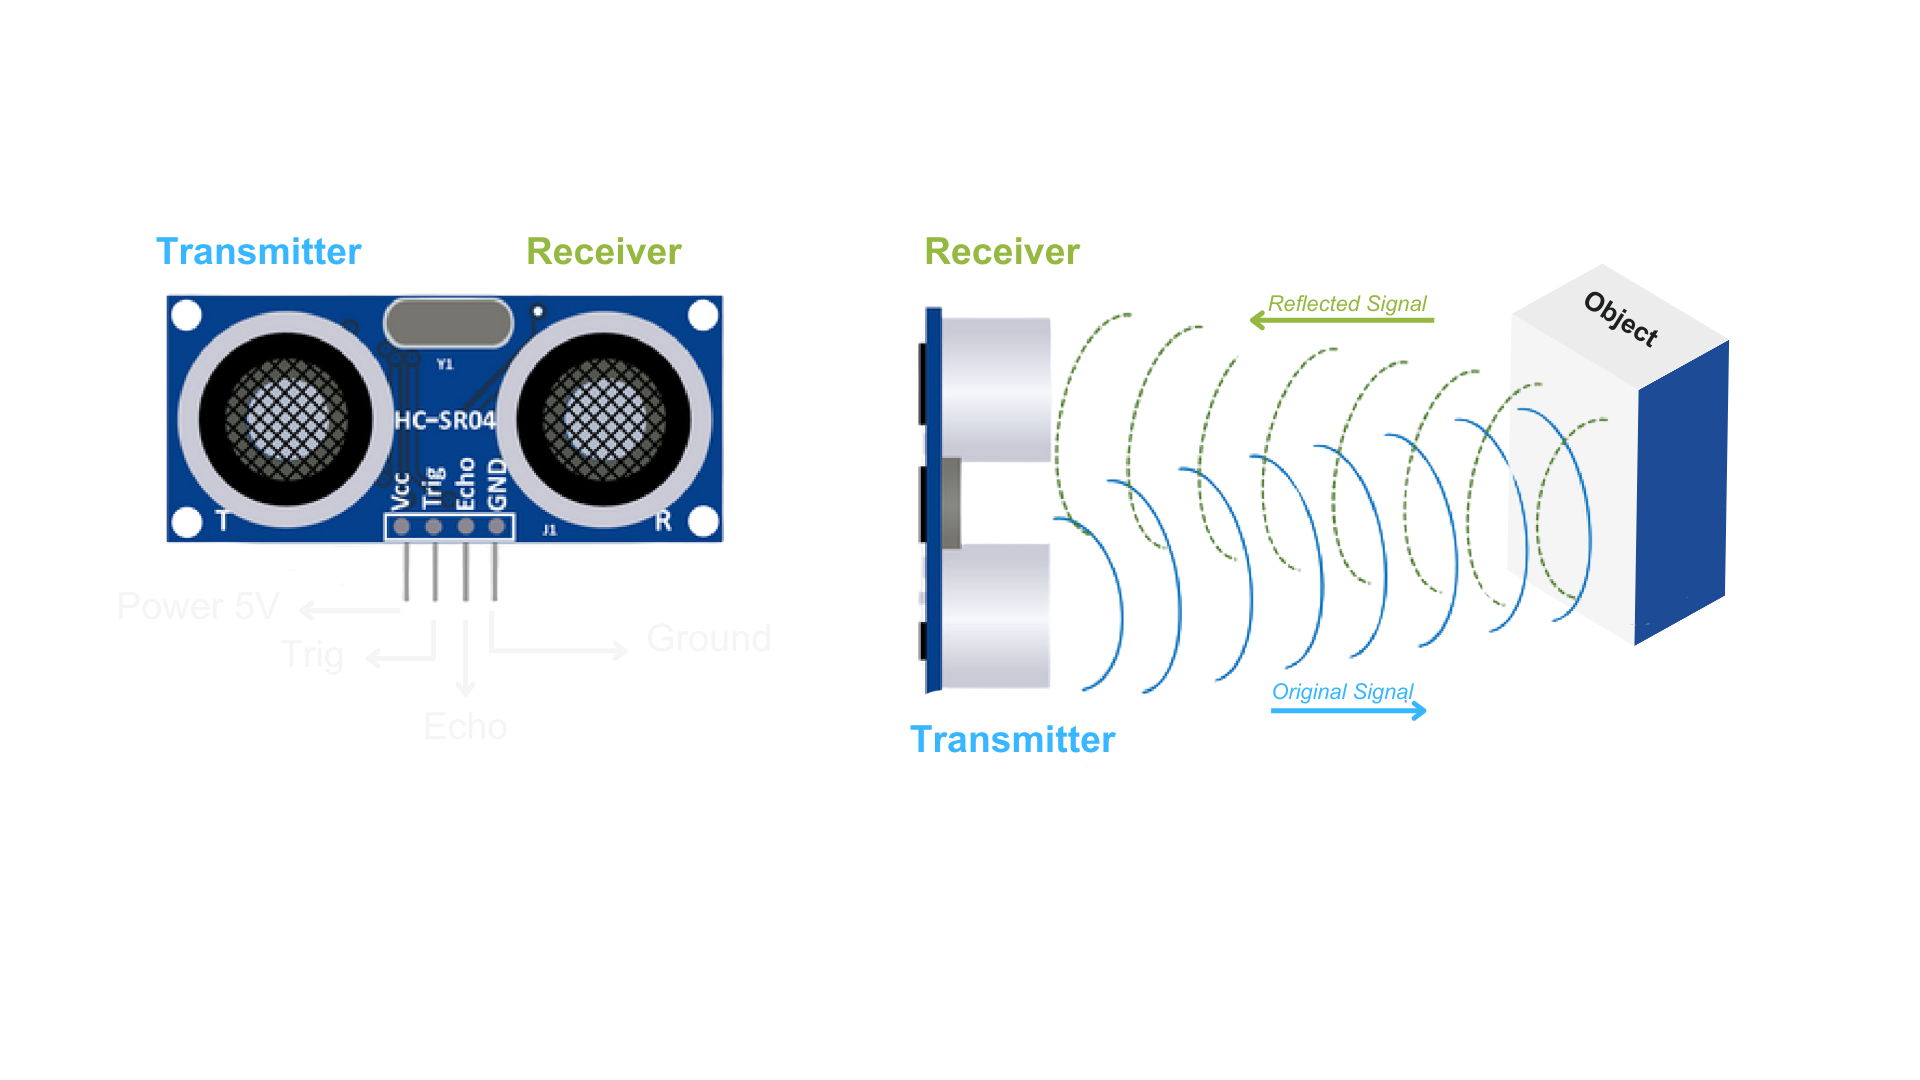
In my third milestone, Arduino Uno, I created move methods for all directions through alternating voltage outputs to the DC motors on the car; allowing the car to turn left, right, forward, and backward. I mapped these new directions to the gesture controller with ‘if’ and ‘else if’ statements corresponding to the output of the MPU6050 Axis Accelerometer. I also implemented two ultrasonic sensors on the car that detect the distance of objects in front of them, by sending ultrasonic sound waves via the TRIG pin and receiving the reflected sound waves via the ECHO pin. The distance reuturned by the ECHO pin represents the distance to travel to the object and back, so I first divided it by 2, and then multipled by 0.034 to calculate the distance in centimeters. Then, in ultraSonic() I returned a boolean based on the magnitude of the distance output of the sensors; true if an object was close (aprox. 15cm), and false otherwise. Then I added the method as a condition to my moveForward() and moveBackward() case statements, so they would only run if there was no object in front of them ‘!ultraSonic()’.

Second Milestone
I built the controller for the car using a half-size solderless breadboard, an HC-05 Bluetooth Module, an MPU6050 Axis Accelerametor, and an Arduino Nano. I wired the GND, 3.3V, RXD, and TXD on the HC-05 to the Arduino Nano. Next, I wired the MPU6050 Axis Accelerometer with 5V and GND on the Arduino Nano, along with the SCL and SDA pins for synchronizing I2C communication between the MPU6050 and the Arduino Nano. I then configured the HC-05’s as ‘master’, and ‘slave’, with Binding Bluetooth Modules. Afterward, I simply mapped the axis output of the MPU6050 to specific directions using ‘if’ and ‘else if’ statements. Then I wrote that direction to the controller’s bluetooth, and read it on the car’s bluetooth in Arduino Nano. Depending on the bluetooth read value, I then invoked the corresponding move method via the Arduino Uno.
First Milestone
In building the Gesture Controlled Robot, my first milestone encompassed building the car’s base, and wiring up all necessary electrical components (boards) to ensure the car was physically functional. I first began by wiring the IN ports on the H-Bridge controller to digital ports on the Arduino Uno. Next, I connected the motors to the terminals on the H-Bridge Controller (OUT1, OUT2, OUT3, OUT4) in a criss-cross orientation. I then connected 4 AA Batteries to the 12V+ and GND terminals on the H-Bridge, which I also wired up to the VIN and GND ports on the Arduino Uno, thus powering the entire car. Furthermore, I connected the Arduino Uno to my laptop via USB type B and uploaded a C++ program using Arduino IDE, Arduino Uno. In setup(), I defined the numbered ports on the Arduino UNO by the inputs they were connected to on the H-Bridge (ex. IN1) and defined each port’s pintype as an output or input using pinMode(). Then in loop(), I sent a digital signal using digitalWrite() and set the IN ports on the H-Brige controller to a HIGH or LOW signal, correctly distributing voltage between motors enabling them to all turn forward.
Final Showcase
Code
Arduino Uno
First Milestone Third Milestone Modification
#include <Wire.h>
#include <SoftwareSerial.h>

// Bluetooth
#define TXD 11
#define RXD 10
SoftwareSerial BT_Serial(TXD, RXD);
// Ultrasonic
#define TRIG1 2
#define ECHO1 4
#define TRIG2 5
#define ECHO2 3

// Maps H-Bridge --> Uno ports
int IN1 = 9;
int IN2 = 8;
int IN3 = 7;
int IN4 = 6;
char z;

void setup() {

   // Configures bluetooth and serial monitor
   Serial.begin(9600);
   BT_Serial.begin(9600);

   // H-Bridge ports to outputs
   pinMode(IN1, OUTPUT);
   pinMode(IN2, OUTPUT);
   pinMode(IN3, OUTPUT);
   pinMode(IN4, OUTPUT);

   // Ultrasonic pin declaration
   pinMode(TRIG1, OUTPUT);
   pinMode(ECHO1, INPUT);
   pinMode(TRIG2, OUTPUT);
   pinMode(ECHO2, INPUT);

}


void moveForward() {
   digitalWrite(IN1, HIGH);
   digitalWrite(IN2, LOW);
   digitalWrite(IN3, HIGH);
   digitalWrite(IN4, LOW);
}

void moveBackward() {
   digitalWrite(IN1, LOW);
   digitalWrite(IN2, HIGH);
   digitalWrite(IN3, LOW);
   digitalWrite(IN4, HIGH);
}

void turnLeft() {
   digitalWrite(IN1, LOW);
   digitalWrite(IN2, HIGH);
   digitalWrite(IN3, HIGH);
   digitalWrite(IN4, LOW);
}

void turnRight() {
   digitalWrite(IN1, HIGH);
   digitalWrite(IN2, LOW);
   digitalWrite(IN3, LOW);
   digitalWrite(IN4, HIGH);
}

void stop() {
   digitalWrite(IN1, LOW);
   digitalWrite(IN2, LOW);
   digitalWrite(IN3, LOW);
   digitalWrite(IN4, LOW);
}


bool ultraSonic1() { // Front UltraSonic Sensor

   digitalWrite(TRIG1, LOW);
   digitalWrite(TRIG1, HIGH);
   digitalWrite(TRIG1, LOW);

    // Calculates distance
   long duration = pulseIn(ECHO1, HIGH);
   float distance = duration * 0.034 / 2;

   if (distance < 15 || distance > 1175) {
       return true;
   }
   return false;
}

bool ultraSonic2() { // Backwards UltraSonic Sesnor

   digitalWrite(TRIG2, LOW);
   digitalWrite(TRIG2, HIGH);
   digitalWrite(TRIG2, LOW);

   // Calculates distance
   long duration = pulseIn(ECHO2, HIGH);
   float distance = duration * 0.034 / 2;

   if (distance < 15 || distance > 1175) {
     return true;
   }
   return false;
}

void determineGesture() {

   if (BT_Serial.available() > 0) {
     z = BT_Serial.read();
   }

   switch(z) {

    case '^':
      if (!ultraSonic1()) {
        moveForward();
      }
      else {
        stop();
      }
      break;

    case 'v':
      if (!ultraSonic2()) {
        moveBackward();
      }
      else {
        stop();
      }
      break;

    case '<':
      turnLeft();
      break;

    case '>':
      turnRight();
      break;

    case '.':
      stop();
      break;
   }

}

void loop() {
   determineGesture();
}
Arduino Nano
#include <SoftwareSerial.h>
#include <Wire.h>
#define VRx A2
#define VRy A1
#define SW1 A0
#define BTN 6 // Button

const int MPU6050 = 0x68; // Motion Detector Chip
int flag = 0;
int16_t X, Y, Z;
int b = 0;

// previous button state
int counter = 0;

SoftwareSerial BT_Serial(2,3);
// RX --> Receives Bluetooth Signal
// TX --> Transmit Bluetooth Signal

void setup() {

  Serial.begin(9600); // Initialize serial communication at 9600 bps
  BT_Serial.begin(9600);
  Wire.begin(); // Initilizes connection between Arduino NANO at 0X6B address
  Wire.beginTransmission(MPU6050);
  Wire.write(0x6B); // Specifies register address (0X6B) to write on
  Wire.write(0);
  Wire.endTransmission(true);
  pinMode(BTN, INPUT);

}


void loop() {
  determineInput();
}


void readAccelerometer() {

  Wire.beginTransmission(MPU6050);
  Wire.write(0x3B);  // starting with register 0x3B (ACCEL_XOUT_H)
  Wire.endTransmission(false);
  Wire.requestFrom(MPU6050, 6, true);  // request a total of 6 registers

  // Accelerometer orientation --> axis
  X = Wire.read() << 8 | Wire.read(); // X - axis value
  Y = Wire.read() << 8 | Wire.read(); // Y - axis value
  Z = Wire.read() << 8 | Wire.read(); // Z - axis value

  X = map(X, -17000, 17000, 0, 180);
  Y = map(Y, -17000, 17000, 0, 180);
  Z = map(Z, -17000, 17000, 0, 180);

}


void motionGesture() {

  readAccelerometer();

  if (X < 60 && flag == 0) {
    flag = 1;
    BT_Serial.write('v');
  }
  else if (X > 130 && flag == 0) {
    flag = 1;
    BT_Serial.write('^');
  }
  else if (Y < 60  && flag == 0) {
    flag = 1;
    BT_Serial.write('>');
  }
  else if (Y > 130 && flag == 0) {
    flag = 1;
    BT_Serial.write('<');
  }
  else if (X > 66 && X < 120 && Y > 66 && Y < 120 && flag == 1) {
    flag = 0;
    BT_Serial.write('.');
  }

}

void joyStick() {

  int X = analogRead(VRx);
  int Y = analogRead(VRy);
  int Z1 = digitalRead(SW1);

  if (X >= 0 && X <= 60) {
   BT_Serial.write('v');
  }
  else if (X >= 1020 && X <=1030) {
    BT_Serial.write('^');
  }
  else if (Y >= 1020 && Y <= 1030) {
    BT_Serial.write('>');
  }
  else if (Y >= 0 && Y <= 5) {
    BT_Serial.write('<');
  }
  else {
    BT_Serial.write('.');
  }

 }

void determineInput() { // Button alternater

  // Current button state
  int a = digitalRead(BTN);

  // Making sure the button is changing value from 0 to 1:
  // if button is clicked
  if (a == 0 && b == 1) {
    counter++;
  }

  b = a;

  if (counter % 2 == 0) {
    motionGesture();
    Serial.println("motion");
  }

  else {
    joyStick();
    Serial.println("joystick");
  }

}
Binding Bluetooth Modules
- hold down resest button while powering module, should result in slow blink
- upload ‘Binding Bluetooth Moduels’ code on the Arduino Uno
- open Serial Monitor, select ‘Both NL & CR’, set the baud rate to 9600
- use ‘AT+ROLE=0’ to set this module to the slave, and ‘AT+ADDR=?’ to recieve slave address (copy it)
- use ‘AT+ROLE=1’ to set other module to master, then bind to slave using ‘AT+BIND= slave_address’
- import ‘SoftwareSerial.h’, declare TXD & RXD pins SoftwareSerial ‘BT_Serial(TXD, RXD)’
- begin bluetooth ‘BT_Serial.begin(9600)’, use ‘BT_Serial.write(‘’)’ and ‘BT_Serial.read()’ to transfer data
- reference Resources for more details Second Milestone
#include <SoftwareSerial.h>

// Use your own ports RX & TX
SoftwareSerial Bluetooth(11,10); //Bluetooth(TX, RX); --> Arduino Uno
//RX --> Receives Bluetooth signal
//TX --> Transmits Bluetooth signal


void setup() {
  Serial.begin(9600);
  Bluetooth.begin(38400); //HC-5 default speed in (AT) bluetooth mode
}


void loop() {

  if (Bluetooth.available()) {
    Serial.write(Bluetooth.read());
  }
  if (Serial.available()) {
    Bluetooth.write(Serial.read());
  }

}
Resources
| Hand Gesture Control Robot Via bluetooth |
| Binding HC-05 Bluetooth Module’s |
| How to Wire and Program a Button |